Getting Started with NeonChainX - IBKR Setup & TWS API Ports
Set up NeonChainX with Interactive Brokers—TWS API ports 7497 (paper) and 7496 (live), enable API access, connect, and start options trading.
This guide walks you through getting NeonChainX running from purchase to first trade execution with Interactive Brokers (IBKR).
⚠️ First-Time Users: We strongly recommend using a paper trading account when you first run NeonChainX to ensure everything works correctly before trading with real money.
TWS API ports: 7497 (paper) vs 7496 (live)
NeonChainX connects to Trader Workstation (TWS) or IB Gateway on your machine. Use these default socket ports in both IB settings and NeonChainX:
| Platform | Paper trading | Live trading |
|---|---|---|
| TWS | 7497 | 7496 |
| IB Gateway | 4002 | 4001 |
Mac install issue? If macOS blocks the app with a "damaged" error, see Fix App Is Damaged on Mac.
Prerequisites
System Requirements
- Windows: Windows 10+ (no additional installs needed)
- macOS: macOS 12+ (no additional installs needed)
- Ubuntu: Ubuntu 20.04+ (officially supported Linux distribution)
Ubuntu Additional Setup
# Ubuntu/Debian
sudo apt update && sudo apt install libxcb-cursor0 libgl1-mesa-glx
Interactive Brokers Account
- Active IBKR account with trading permissions
- TWS or IB Gateway installed
Step 1: Purchase NeonChainX
- Visit /pricing
- Choose your preferred plan
- Complete checkout with your email
- Save your license key from the confirmation email
Step 2: Download & Install
Download
- Go to /downloads
- Enter your license email and key
- Download for your platform
Install
Windows:
- Run the
.exefile directly - If Windows Defender/SmartScreen warning appears:
- Click "More info" then "Run anyway"
- Or go to Downloads folder, right-click the file > Properties > "Unblock" > OK
macOS:
- Open
.dmgfile - Drag to Applications folder
- If security prompt: System Preferences > Security & Privacy > "Open Anyway"
Ubuntu:
- Extract the downloaded archive to a folder of your choice
- Run the automatic installation script by first changing the permission
chmod +x install.sh - Run the automatic installation script
./install.sh - The script will automatically handle dependencies, desktop integration, and PATH setup
Step 3: Configure Interactive Brokers
Enable API Access
First, you need to enable API access in either TWS or IB Gateway. This allows NeonChainX to connect to your IBKR account.
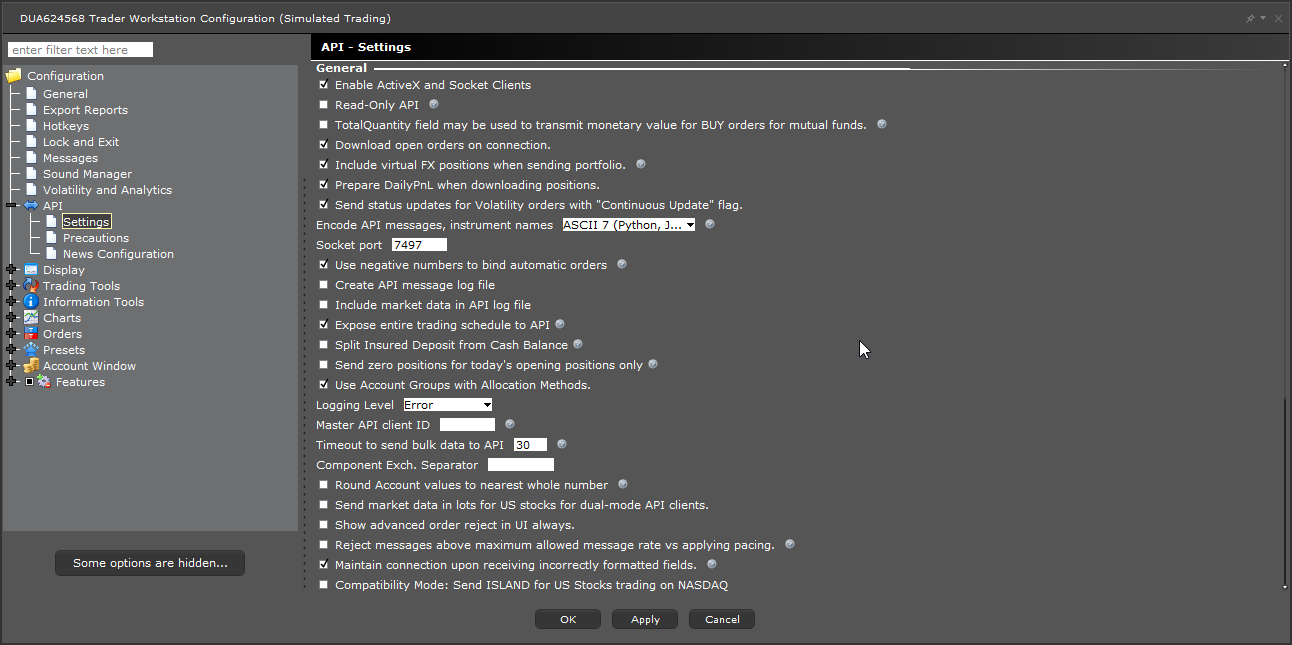
TWS (Trader Workstation) - Recommended:
- Open TWS and log in
- Go to File > Global Configuration > API > Settings
- Check "Enable ActiveX and Socket Clients"
- Uncheck "Read-Only API" (required for trading - this is critical!)
- Set Socket port:
7497for paper trading7496for live trading
- Add
127.0.0.1to Trusted IP Addresses (click "Add" if needed) - Click Apply and OK
📚 Reference: For detailed information about TWS API settings and configuration, you can also check the official IBKR TWS API Settings documentation.
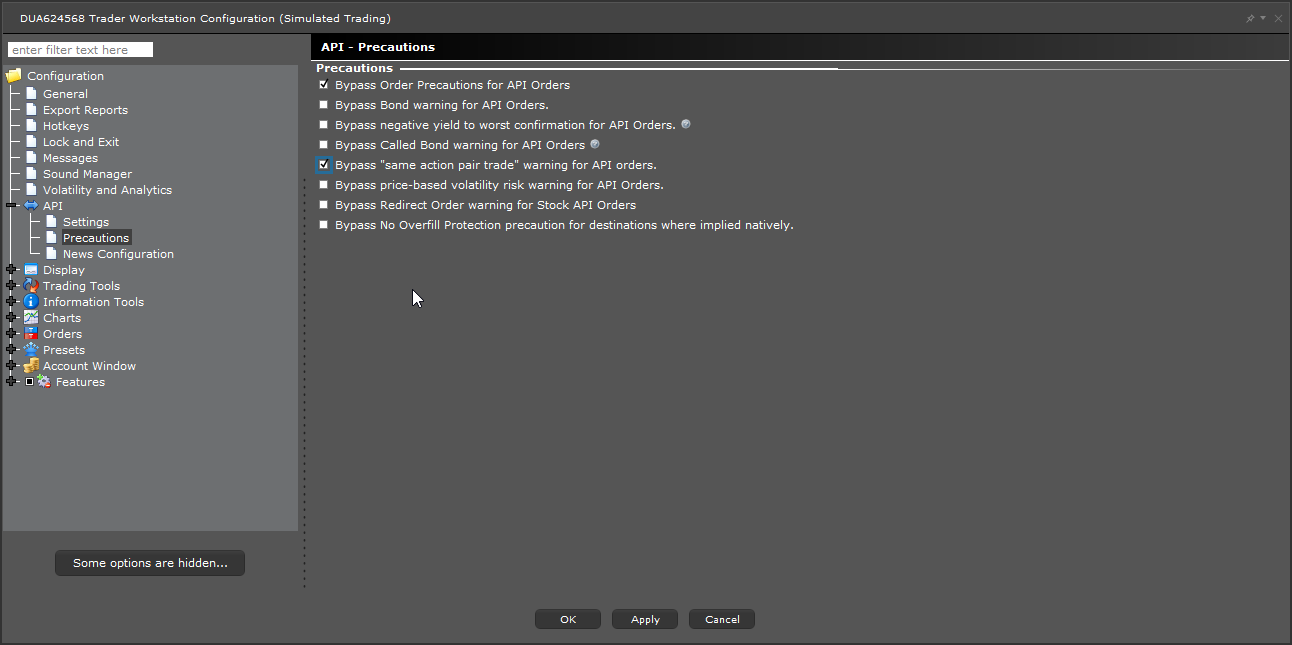
API Precautions (Recommended):
For smoother API operation, configure API Precautions:
- Go to File > Global Configuration > API > Precautions
- Recommended settings:
- Check "Bypass Order Precautions for API Orders" - Allows API to execute orders without manual confirmations
- Check "Bypass 'same action pair trade' warning for API orders" - Prevents duplicate trade warnings
- Leave other precautions unchecked unless you have specific needs
- Click Apply and OK
- Restart TWS for all changes to take effect
IB Gateway:
IB Gateway uses the same API settings as TWS, with only the port numbers being different. When you launch IB Gateway:
- Launch IB Gateway and log in
- When prompted, configure API Settings (same settings as TWS):
- Check "Enable ActiveX and Socket Clients"
- Uncheck "Read-Only API" (required for trading)
- Set Socket port:
4002for paper trading4001for live trading
- Add
127.0.0.1to trusted IPs
- Configure API Precautions (same as TWS):
- Go to API > Precautions in the configuration menu
- Use the same recommended settings as shown for TWS above
- Click OK
Important: The account type you use to log in to TWS/Gateway (paper or live) determines what account NeonChainX will access. Log in with your paper account to trade paper money, or live account for real trading.
Configure NeonChainX Connection
- In NeonChainX, go to Configuration tab
- Set connection parameters:
- Host:
127.0.0.1 - Port:
- TWS:
7497(paper) /7496(live) - Gateway:
4002(paper) /4001(live)
- TWS:
- Client ID:
1
- Host:
- Click "Save Settings"
Step 4: Connect & Test
- Ensure TWS/Gateway is running and logged in
- In NeonChainX, click "Connect"
- Wait for green connection status
- Verify the top bar shows your account type (Demo/Live), balance, and trading preferences (position sizing method)
- Test: Add symbol "AAPL" and verify options data loads
Note: When reconnecting, NeonChainX restores your previously added symbols automatically. Market data loads in the background so you can get back to trading quickly.
Step 5: First Trade (Use Paper Trading)
Recommended: Start with paper trading ports to practice risk-free
- TWS paper: port
7497 - Gateway paper: port
4002
Basic Flow
- Research in TWS/charts
- Execute trades in NeonChainX
- Monitor positions
- Manage exits/adjustments
Troubleshooting
Connection Issues
- "Connection failed": Check TWS/Gateway is running, port numbers match, and
127.0.0.1is trusted - "API not enabled": Enable API in settings and restart TWS/Gateway
License Issues
- "Invalid license": Verify email/key exactly as received, check for extra spaces
Ubuntu Display Issues
If GUI doesn't display properly:
# Install additional dependencies
sudo apt install libfontconfig1 libfreetype6 libx11-6